How to Laser Mark Acetal Setting, Guides, Parameters & Tips
Introduction
Acetal (also called POM, Delrin®, polyacetal) is a high‑performance engineering thermoplastic used widely in precision parts, engineering components, bearings, gears and enclosures. It is prized for its:-
- Good mechanical properties (strength, stability, stiffness, wear resistance and low friction).
- Low moisture absorption, good dimensional stability.
- Smooth finish, machinability, etc.
Why laser mark acetal? Some of the applications include:
- Part identification: serial numbers, logos, QR / data matrix codes.
- Traceability (especially in regulated industries).
- Branding.
- Surface decoration or labeling on parts where traditional printing or engraving may wear off.
- Cutting small windows or features into acetal parts (if the laser supports cutting).
Advantages of Laser Marking Acetal
Laser marking is becoming more and more frequent in industrial applications as they are seen as particularly reliable and provide numerous advantages. Laser marking is extremely robust and also tamper-proof. Its application can also be of a high quality. Further advantages of plastic laser marking (versus conventional marking technologies) are:
- Permanent marking, as it is waterproof, wear- and heat-resistant, lightfast and resistant to chemicals
- Maximum flexibility in the marking design – also suitable for locations that are hard to access
- Non-contact process
- and therefore no wear and tear of tools and no costs for consumables such as chemicals, inks etc.
- The material remains free from pressure, tensions and fixings, so that consistently uniform results can be guaranteed
- Unimpaired surface (colour change)
- Simple handling, no pre or post-treatment required
Disadvantages of Laser Marking Acetal & Special Considerations
- Natural Acetal: Natural (unpigmented) acetal often does not colour‑change or mark well because there is no additive to absorb the laser or change with heat. Black acetal with carbon pigment works much better. Modified acetal with laser‑additives show good contrast.
- Pigmented or Additive Dependent: Some acetal materials are modified (pigmented, or have laser‑additive fillers) to improve markability. Without such modifications, marking may be weak or non‑existent. – laser additive filler concentration may vary between batches.
- Heat sensitivity: Polymers melt, char or deform if the energy input is too high.
- Thickness: Thicker sheets absorb or dissipate heat differently. For deep engraving or cutting, multiple passes or higher power may be needed. Also heat transfer into mass can distort or warp parts.
- Surface Finish: Glossy, smooth surfaces reflect/deflect more energy. Matte or textured surfaces may absorb more consistently. Smooth, clean surfaces work better. Contaminations (dust, oils) and roughness influence the quality.
- Ventilation & Fumes: Acetal may produce hazardous gases when burned. Always use proper extraction / ventilation. Use of air assist helps to remove debris.
- Masking / Coatings: Sometimes masking with paint or using contrast agents helps if natural acetal won’t mark. Or using pigmented/acrylic coatings. But the masking must be compatible with laser process.
Knowing the right combination of laser type (wavelength, pulse or continuous), power, speed, focal settings etc. is critical to getting good results.
Laser Types & Wavelengths
| Laser Type | Wavelength | Advantages for Acetal | Caveats |
|---|---|---|---|
| CO₂ Laser (10.6 µm) | ~10.6 µm infrared | Good for cutting acetal cleanly; can produce relief/engraving with high detail. Works well if material absorbs at that wavelength. | Risk of melting, charring if power too high. Less effective on unpigmented acetal for contrast. |
| Fiber / Nd:YAG / Nd:YVO₄ (~1.06 µm etc.) | Near‑IR | Can do colour change marking (foaming etc.) on pigmented acetal; fast pulse lasers reduce heat transfer. | Unmodified (natural) acetal often doesn’t show mark with fibre/NIR laser. Need additives/pigments. Also risk of burning/melt if too much power. |
Key Parameters to Control
For good laser marking (or shallow engraving) on acetal, you need to consider:
| Parameter | What it controls / affects | Why it’s important for acetal |
|---|---|---|
| Wavelength / laser type | Determines how well the material absorbs the laser light | CO₂ (10.6 µm) is absorbed well and yields clean, sharp marks; fiber/diode may need pigment to show contrast. |
| Power (watts or % of max) | Higher power gives deeper mark or faster marking; low power avoids damage | Too much power → melting, charring, distortion; too little → no visible mark. |
| Speed | How fast the laser head plants pulses / scans over material | Slow speed = more heat, deeper / darker mark; but risk of melting. Fast speed = shallower mark, may be faint. |
| Pulse frequency / repetition rate | Number of laser pulses per second, or in pulsed lasers, the spacing of pulses | Affects surface smoothness, contrast, heat buildup. Lower frequency = higher peak energy per pulse, possibly deeper but more risk. High frequency = smoother, but may not penetrate/pigment activation well. |
| Fill spacing / hatch / raster resolution | If marking solid areas, how close the lines are spaced | Closer = darker, more uniform marks; wider = quicker but less dense. Also affects risk of overheating. |
| Focus (spot size, focal position) | Where the laser is focused, and how tight the spot is | Sharp focus gives fine detail; slight defocus may reduce harsh edges or spread heat more evenly. |
| Passes | Number of times the laser goes over the same pattern | Multiple passes at lower energy may achieve a darker mark without burning. |
Step‑by‑Step Process for Setting Up a Mark on Acetal
Here’s a process you can follow to dial in a good mark on acetal:
- Material selection & preparation
- Choose an acetal grade that is modified for marking, if possible.
- Clean the surface (remove oils, dirt).
- If the part has pigment, color, or surface finish variations, test on those areas.
- Safety & machine readiness
- Use extraction and ventilation (plastic fumes).
- Ensure optics are clean.
- Use air assist if available (helps cool, remove debris).
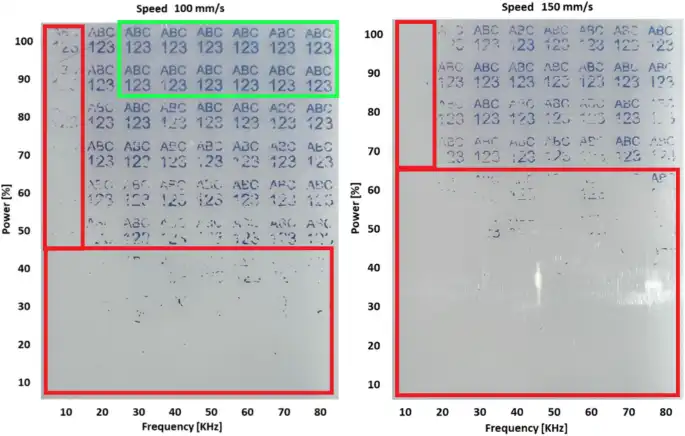
- Initial parameter test matrix
- Start with Conservative Settings
- Start with lower power and faster speed (light marking), to avoid damaging material.. Run a small test mark (logo or text).
- Then vary one parameter at a time (e.g. increase speed, then decrease, change power etc.) to see effect.
- If you have material do a test matrix as shown below
- Assess contrast, clarity, no damage
- Look for a number of things: is the mark clearly legible? Edges sharp? Any melting or gloss change? Any warping?
- If contrast is low, try increasing power, reducing speed, or adding pigment/additive.
- Protective steps:
- clean surfaces, use air assist, ensure good focal alignment, keep optics clean.
- Finalize
- Choose the settings that give acceptable contrast + durability + no damage.
- If consistency matters (e.g. in production), lock those in, and monitor over time (material batches, laser age etc. can shift things).
Example Setting from previous work pieces
This example was done in our subcontract laser marking department, the marking is on ‘Blue’ pigmented Acetal. The units were being used in a food production capacity to hold electronic components and to ensure that they were safe from the washing cycles of the machines.
The laser that was used in the production of these pieces was our in house Nd:YAG flash lamped laser unit. The system was fitted with a GSI lumonics scanhead and a f-255mm f-theta lens. The laser setup and marking parameters were as follows: –
| Wavelength / laser type | 1064nm 70watt Flashlamped Laser |
| Power | 80% |
| Speed | 35 mm/s |
| Pulse frequency / repetition rate | 2 KHz |
| Fill spacing / hatch / raster resolution | 0.06mm @ 45 Degrees |
| Passes | 1 |
If you would like further information on How to Laser Mark Acetal or any other material. Please either visit our Case Studies page, request a call back or talk to one of our laser marking specialists by going to our contact page – link below.
Contact Us for Laser Engraving, Marking & Cutting Advice (thinklaser.theprogressteam.com/)