How to Laser Mark Aluminium: A Complete Guide for High-Contrast, Durable Results
Introduction
Laser marking aluminium is a highly desirable process in many industries: aerospace, electronics, signage, medical devices, and custom goods. Compared with traditional engraving or printing, laser marking offers precision, permanence, and minimal physical stress on the part. However, aluminium presents unique challenges due to its high reflectivity, good thermal conductivity, and variable surface finishes. In this article, we explore principles, correct equipment, process steps, parameter tuning, safety, and troubleshooting to help you master laser marking aluminium.
Why Laser Mark Aluminium?
Before diving into the how, it’s useful to understand why laser marking is preferred in many contexts:
- No contact / no tooling wear: The laser doesn’t physically touch the metal, avoiding tool wear or distortion.
- High precision & fine details: Small fonts, logos, barcodes, QR codes, micro‑features can be marked.
- Permanence: Properly done, marks resist abrasion, chemicals, UV, and harsh environments.
- Versatility: You can mark bare, anodized, or coated aluminium with the right techniques.
- Reduced post‑processing: Minimal cleanup compared to acid etching or mechanical engraving.
That said, aluminium can be tricky. Its high reflectivity tends to send much of the laser energy back rather than being absorbed; its good thermal conduction dissipates heat; and surface conditions (polish, anodize, coatings) strongly affect results.
Types of Aluminium Surfaces & Their Behaviors when Laser Marked
Understanding the starting surface is critical. Here are common aluminium surface types and how lasers interact with them:
| Surface Type | Behavior under Laser | Typical Use Cases & Challenges |
|---|---|---|
| Bare / uncoated aluminium | Laser tends to produce light grey or white marks (via oxidation or micro‑texturing). High reflectivity reduces absorption. | Often used for subtle branding, functional parts, or where contrast is not critical. Achieving a deep black mark is difficult without additives. |
| Anodized aluminium | The laser ablates or removes the dye/oxide layer to reveal the bare aluminium underneath, producing high contrast. | Very common in nameplates, consumer electronics, signage. With a MOPA laser, even “black marking” (re‑oxidized dark marks) is possible. Trotec Laser GmbH+2Trotec Laser GmbH+2 |
| Powder-coated or painted aluminium | The laser removes the coating to expose the base metal, creating contrast. Care needed to avoid damaging substrate. | Useful when colour contrast is desired, or for branding on finished parts. Some coatings ablate cleanly, others char. |
| Textured / brushed / matte aluminium | The texture helps scatter reflections and increases absorption, often leading to better marking efficiency. | Good compromise surfaces; less reflective than mirror finishes. |
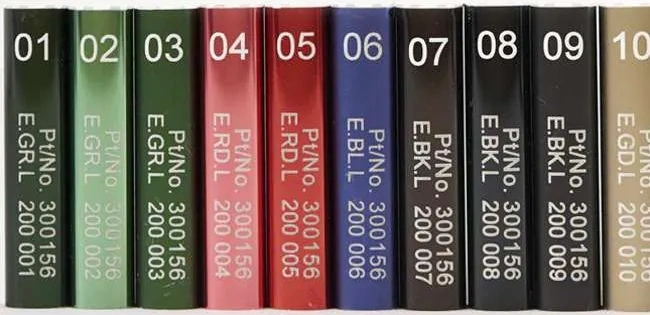

In practice, most high‑contrast and industrial applications favour laser marking anodised aluminium because the laser effectively “knocks out” dye without deep cutting into the substrate. However, bare aluminium can be laser marked (e.g. via oxidation or additives), while coated surfaces can be ablated.
Choosing the Right Laser & Equipment
The laser system you use has a huge effect on what is possible. Below is a summary of popular laser types and their suitability for aluminium:
Laser Types and their Interaction with Marking Aluminium
- Fiber Lasers (near‑infrared, ~1,060 nm)
These are widely used for marking metals, including aluminium, because their wavelength is well absorbed by many metals. They offer high precision, reliability, and long lifetimes. - MOPA Lasers
A variation of fiber lasers, MOPA (Master Oscillator Power Amplifier) allows customization of pulse durations, enabling “black marking” on anodised aluminium (instead of simply ablating dye). - CO₂ Lasers
CO₂ lasers are not well absorbed by bare aluminium, so they struggle to engrave metal directly. They can, however, remove coatings (e.g. anodize or paint) to expose the base metal. - Diode Lasers / Solid‑State / UV
These have limited use on bare aluminium unless coatings or marking sprays are used. UV lasers (short wavelength) may be used in niche applications.
Generally, a fiber (or MOPA) laser is considered the most reliable and flexible option for aluminium marking, especially for industrial applications.
Key Equipment & Accessories
- Focusing optics / lenses: The focal length (spot size) matters. For fine detail, shorter focal-length lenses are better.
- 3D/auto-focus head: In parts with variable surfaces, a head that measures distance and dynamically focuses helps maintain consistent results.
- Fume extraction & filtration: Coatings, dyes, or ablated metal generate fumes and particles; proper extraction ensures operator safety and cleaner optics.
- Fixture, jig, or engraving bed: To maintain flatness, repeatability, and correct standoff distance.
- Masking / protective film: Laser‑safe masking tape or film can protect surrounding areas from heat or smoke stains.
- Protective eyewear & enclosure: Because aluminium is reflective, stray or back-reflected beams can be dangerous. Use a fully enclosed, interlocked housing and wavelength-rated eyewear.
Step‑by‑Step Process: How to Laser Mark Aluminium
Here’s a generic workflow. Always perform risk assessments and make test runs.
1. Define Your Mark Objectives & Specifications
- Contrast vs. subtlety: Do you need bold black/white contrast, or a subtle grey mark?
- Mark size, depth, and precision: Dimensions, minimum feature sizes (text, barcode modules), tolerances.
- Durability / environment: Will the part face abrasion, chemicals, outdoor exposure?
- Material & finish spec: Note the aluminium alloy, temper, surface finish, coatings, and how flat or rigid the part is.
Having these specs documented helps guide everything downstream.
2. Surface Preparation
- Clean thoroughly: Remove dust, oils, greases, fingerprints, residues. Use isopropyl alcohol or mild solvents.
- Blow off debris: Use compressed air to clear particles.
- Mask areas (optional): Use low-tack, laser-safe masking tape or film for adjacent areas. Test peel-off to ensure no adhesive residue or damage.
- Ensure flatness: Use shims or precision supports so the surface is level and at a consistent height across the engraving region.
- Protect from fingerprints: Wear gloves until marking is done.
3. Fixture and Alignment
- Secure the aluminium part to avoid movement or vibration during marking. Even small shifts can ruin micro‑features.
- Use fiducial marks or alignment jigs to ensure repeatability in batch jobs.
- If parts vary in height, use the auto‑focus or height compensation feature (if available).
4. Parameter Testing & Calibration (Matrix)
Rather than jumping in full production, run a parameter matrix test on a scrap sample of the same alloy and finish. Vary:
- Laser power
- Scan speed
- Pulse frequency
- Pass count
- Hatch spacing / line spacing
- Focus offset (slightly above or below surface)
Compare results in terms of contrast, sharpness, edge quality, depth, burrs, heat damage, or halo effect.
Include a QR code / barcode block in the test area so you can validate real-world readability under your various parameter sets.
5. Engrave / Mark the Part
Once you’ve dialed in your optimal settings:
- Import vector artwork (convert fonts to outlines)
- Position the work in your laser software, aligning with your fixture
- Use your decided parameters
- Monitor the run (look for smoke, discoloration, overheating)
- After marking, allow for cooling before handling, especially in crowded batch runs
6. Post‑Processing & Quality Checks
- Remove masking (if used)
- Blow off any residue or particles
- Inspect the mark under magnification or microscope (edges, sharpness, halo, smearing)
- Test durability (see next section)
- For QR/barcode or data matrix marks, scan and verify readability
- Photograph and document results for future reference
7. Durability & Stress Testing
To ensure the mark holds up:
- Dry rub / abrasion test: Rub the mark with a standardized cloth or pad for a fixed number of strokes; observe fading.
- Solvent wipe: Wipe with common cleaning agents (alcohol, detergents) and see if contrast or integrity degrades.
- Light abrasion / scuff test: Use a fine nonmetallic pad (e.g. nylon scouring pad) to test edge robustness.
- Environmental exposure (optional): Salt spray, humidity, UV exposure if part is for outdoor use.
If a mark fails, you may need to adjust power, number of passes, or even adopt a different marking strategy.
Optimizing Parameters & Best Practices
Here are key tips when tuning your process:
Power vs Speed: The Trade-off
- Higher power, lower speed → deeper, darker marks, but risk of overheating, melting, burrs
- Lower power, higher speed → lighter, more subtle marks, faster throughput
- The sweet spot usually depends on the alloy, surface finish, and application.
Focus & Beam Control
- Keep the focus within a ±1.5 mm window around the surface for best quality.
- Try slight positive or negative offsets to improve contrast or edge crispness.
- Use tight hatch/line spacing for denser fills; coarse spacing speeds up but may reduce edge clarity.
Pass Strategy
- Multiple light passes are often better than one heavy pass—less thermal stress, better edge control.
- Limit number of passes to avoid heating, warping, or discoloration.
- Avoid dwell (lingering in one spot)—smooth, consistent motion yields better marks.
Using MOPA & Pulse Duration for Black Marking
On anodised aluminium, shorter pulse durations (e.g. nanoseconds) via MOPA lasers allow the anodised layer to be repainted (rather than removed), producing deep black marks instead of just lighter cuts.
For example: using ~8 ns pulses at 200 kHz, power ~50 %, speed ~1,500 mm/s, line spacing ~0.001 mm for rich black marking.
Avoiding Heat Damage, Burrs, and Discolouration
- Use air assist or gas to remove heat and molten debris
- Reduce power or increase speed if you observe melting edges or heat tint
- Improve cooling cycles or let parts rest between adjacent marks
- Use masking to protect surrounding areas
Surface Finish & Pretreatment
- Polished/mirror finishes reflect too much energy — consider lightly texturing or abrading before marking
- If bare aluminium is difficult to mark, consider applying a marking spray that bonds with the laser and yields dark, durable printing.
- Ensure the coating is fully dried/cured before engraving
Safety, Hazards & Best Practices
Laser marking aluminium presents special hazards due to reflectivity and the fumes produced.
Reflective Beam & Back‑Reflection Risk
Aluminium is highly reflective; stray or back-reflected laser beams can injure operators or damage equipment. To mitigate:
- Always use a closed, interlocked enclosure
- Use beam dumps or angled fixtures so residual beams are absorbed safely
- Position parts so reflections go into safe zones (not toward windows or operators)
- Use laser safety goggles rated for your laser wavelength
Fume Extraction & Filtration
Marking coatings or anodised layers generates vapors, particulates, and fine metal dust. Use:
- High‑quality fume extraction systems with filters (Bofa, Purex)
- Pre-filters and HEPA or activated carbon filters (depending on material)
- Proper ventilation in the workspace
- Regular cleaning of filters and ducts
Fire & Heat Considerations
- Never leave a laser run unattended
- Keep a fire extinguisher rated for electronic / metal fires nearby
- Avoid marking highly combustible coatings without understanding their behavior
- Monitor for smoke or unexpected reactions
PPE, Interlocks & Procedures
- Use gloves when handling parts to prevent contamination
- Ensure interlock switches disable the laser when the chamber is opened
- Use emergency stop buttons
- Train operators on safety rules, beam paths, and response protocols
Troubleshooting Common Problems when Laser Marking Aluminium
Here are typical failure modes and how to address them:
| Problem | Likely Cause(s) | Remedy |
|---|---|---|
| Very faint or no mark | Reflectivity, insufficient power, wrong wavelength, defocus | Increase power, use lower speed, check focus, use marking spray, switch to fiber laser |
| Gray / low contrast mark | Dye layer not fully ablated, too light pass | Increase passes, adjust hatch density, lower speed |
| Melting / burrs | Too much heat, too many passes, insufficient air assist | Reduce power or passes, increase speed, enhance cooling/air assist |
| Halo or “ghosting” around edges | Scattering or heat diffusion | Sharpen focus, tighten hatch spacing, reduce dwell time |
| Inconsistent marks across batch | Variation in height, surface, alignment | Use flat fixtures, auto-focus, test each batch |
| QR/barcode not readable | Insufficient contrast, poor edge quality, module size too small | Re-tune parameters, simplify design, enlarge modules |
| Smoke stain on surroundings | Thermal smoke deposition | Use local masking, improve fume extraction, adjust gas assist |
Example Workflow Recap & Checklist
- Define marking objectives (contrast, durability, size).
- Select suitable aluminium surface (anodised, painted, textured).
- Choose laser type (ideally fiber / MOPA for flexibility).
- Clean and mask the surface.
- Fixture and align the workpiece.
- Run parameter matrix tests on scrap.
- Choose optimal settings (power, speed, frequency, passes, focus).
- Engrave the actual part.
- Post‑inspect, scan codes, test durability.
- Document settings, log batch reports.
- Maintain optics, clean filters, recalibrate periodically.
Best Settings for Aluminium Laser Marking on our inhouse machines
The laser that was used in the production of these pieces was our in house 70watt SPI EP-Z fibre Laser unit. The system was fitted with a Scanlab scanhead and a f-255mm f-theta lens. The laser setup and marking parameters were as follows: –
| Wavelength / laser type | 1070nm 70watt EP-Z Laser |
| Power | 5 |
| Speed | 2000 |
| Pulse frequency / repetition rate | 75 KHz |
| Fill spacing / hatch / raster resolution | 0.075 @ 45/135 Degrees |
| Passes | 1 |
If you would like further information on How to Laser Mark Aluminium or any other material. Please either visit our Case Studies page, request a call back or talk to one of our laser marking specialists by going to our contact page – link below.
Contact Us for Laser Engraving, Marking & Cutting Advice (thinklaser.theprogressteam.com/)